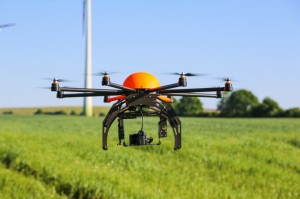
“Farm security” used to be synonymous with “watchdog” or maybe “shotgun,” but farms have gotten a whole lot bigger than even a big dog or a light sleeper can protect. And farm equipment and inventory haven’t gotten any cheaper to replace.
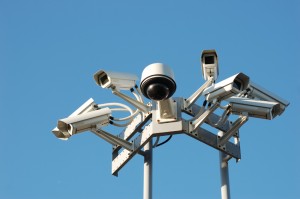
For that reason, I have long been a proponent of using cameras for both farm operations (e.g. being able to see what’s going on in a livestock barn while you’re in bed) and farm security.
For operational use, IP cameras are easy (as long as you have a network). Just hook up a camera, find its IP address on your router, and use a phone, tablet, or computer to take a look any time you want. If you want to see it when you’re off your network, port-forward to the camera from your router.
For security use, however, you want to watch it all the time. Staying up all night staring at the computer screen is not really practical, but there are some good alternatives. My favorite one is a program called “Sighthound.” It runs on your Windows PC or Mac, it’s reasonably priced ($250 as I’m writing this), As long as you have a machine that’s on 24×7 (like my desktop machine), it’s a great solution.
Sitehound has a number of attractive attributes:
Runs on either Windows or Mac
Works with a very broad variety of cameras
Very easy to set up and use
Object-based motion tracking instead of just motion detection
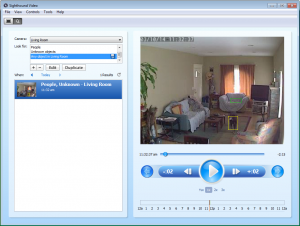
That last point deserves some explanation – simple motion detection (like the built-in detection on inexpensive IP cameras) just looks for pixels to change from frame to frame, and they “alarm” if a certain percentage of the pixels in the picture change. The problem is that a lot of the pixels change any time the lighting changes (sunup, sundown, sun going behind the clouds, etc.) so you get a lot of false alarms. Better systems allow you to specify “zones” for motion detection, so you are only considering the part of the picture you are actually concerned with. This reduces, but does not eliminate these “false positives.” But Sighthound uses a much more accurate (albeit processor-intensive) method to identify and track moving objects in the picture. In the picture here, Sighthound is tracking the dog walking through the living room – you can see the dog in the yellow box near the bottom of the screen. This video was recorded automatically from the moment the dog moved until she went out of sight. However, even on a day when clouds are crossing the sun and the light coming through the window is almost constantly changing, it doesn’t record unless the dog (or something else) moves.
Sighthound has a number of really nice features, including a built-in webserver which allows you to view it from another computer, tablet, or smartphone. You can port-forward to your computer and access Sighthound from anywhere on the Internet.
Sighthound is, of course, no better than the cameras and computer you are using – if they are poorly set up, unreliable, or have poor connections to the network, Sighthound will fail to work properly. But, if your computer, network, and cameras are reliable, Sighthound can provide outstanding monitoring and alerting for your farm or ranch.
Every so often I run into someone who asks, “Why would I want a WiFi network across my farm? I have a cellphone that will access the Internet anywhere I go…”
It’s kind of a funny argument, for a few reasons:
If you have good cellular data access across your entire farm, you’re in the minority – most people in the rural U.S. and Canada have no or only very slow Internet access via the cellular network on some, most, or all of their properties.
Even if you have Internet access via cellular, it’s almost always slower than WiFi. It’s been my experience that people appreciate WiFi a lot more after they get a smartphone.
Having a local-area network (LAN) enables you to do more than just access the Internet – it allows you to use IP cameras, weather stations, soil sensors, and other devices to keep track of what’s happening on the farm, and even use network-connected relays, grain dryers, irrigation, lighting, and HVAC systems from anywhere on the farm
The cellular service providers (AT&T, Verizon, etc.) originally only used the cellular networks for both voice and data – but the data connections were at “modem-speed” – kilobits per second. Then smartphones (led by the Blackberry and Nokia phones) started to be capable of much more data usage – email and even some web browsing – and phone manufacturers started including WiFi connectivity. Later on, cellular providers offered faster cellular data options (“3G” and “4G”), but modern smartphones still use the cellular network for voice, and the voice network is still separate from the data network. The upshot is that, in many rural areas, you can make or receive voice calls and get or send text messages, but you may not be able to load a web page or send an email unless your have a nearby WiFi network.
A new article in Businessweek points out some new providers are actually turning that model on its head, introducing phones that use the WiFi network by default for voice and data, and only access the cellular network if there is no known WiFi network in range.
Now, I have a cellphone with a data plan, and I pay over $120 per month even though my phone is on WiFi about 90{8fd1ffa65f67a2e931916b3c1288d51eed07dc30586a565c92d055673de7c64e} of the time. If I weren’t traveling all over the place on Ayrstone business, I’d be very tempted to get one of these Republic Wireless or Scratch Wireless phones and save about $80-100 of that bill per month.
For people who have a Wireless Farm Networking system to provide farmwide WiFi, these new phone plans may be very tempting.
We were curious about that question ourselves, so we commissioned a survey of growers across the corn belt.
We got over 100 responses to our call from Minnesota to Tennessee and Ohio to Nebraska, all across the Midwest.
All things wireless top the list of technology-related gifts that farmers want for Christmas this year. More than 40 percent of those surveyed are putting wireless remote cameras and wireless remote weather station / soil sensors on their lists. And nearly 50 percent would like a wireless farm network that extends up to 7.5 miles from their homes.
Farmers are also frustrated by the lack of connectivity on their farms. In fact, nearly 80 percent of those surveyed said they are frustrated that their wireless network does not extend to sheds, grain bins or nearby fields.
Other technology-related gifts that farmers say they want according to the survey include wireless remote grain monitoring, an iPad or other tablet, a new router, and remote thermal imaging.
If you’re worried that Santa might not deliver this year, you might want to take care of yourself: go to ayrstone.com and start a new AyrMesh Network for yourself (or expand your existing network) so you have the wireless access you need!
It’s actually an old joke in the wireless networking world: what’s the worst part of wireless networking? The wires!
(OK, it’s an old dumb joke…)
While having WiFi all over the farm is incredibly useful, the only way to make it happen is using Ethernet cables. While Ethernet cables are very simple devices, there are an amazing number of variations and types of Ethernet cables, an choosing the wrong ones (or using them poorly) can cost you time and money.
What is an Ethernet cable?
Courtesy of WikiMedia
Ethernet cables all have some common characteristics: they contain 4 pairs of wires, with each pair twisted around each other (so they are called “twisted-pair” cables). They have an outer sheath to protect the wires inside and they use RJ-45 connectors to connect to networking devices.
The 4 pairs of wires inside the sheath are usually colored green, brown, blue, and orange – one solid and one striped for each color. The wires are usually 100{8fd1ffa65f67a2e931916b3c1288d51eed07dc30586a565c92d055673de7c64e} copper, but some cheaper cables are made of alloys. Alloy cable works OK for short lengths, but should not be used for cables longer than 25 feet. There is sometimes an uninsulated wire running down the middle of the cable called a “drain wire” – this is meant to provide a common ground for the equipment the cable is connected to.
The wires are usually about 24 gauge (AWG), but some cheaper cables use 26 gauge wire, and some more expensive cables use 22 gauge wire. Obviously, the bigger the wire the better, as long as it’s pure copper, but bigger wire also makes heavier cables. It makes a difference if you’re hauling it up a ladder, believe me.
Kinds of Ethernet Cables
Under the sheath, some cables have a shield made of metallic braid or foil. This shield keeps outside noise from penetrating the cable and disrupting the signal on the wires. Unshielded cables are designated as “UTP” (Unshielded Twisted Pair), while shielded cables are designated “STP” (Shielded Twisted Pair). Our experience shows that any cable over 25 feet should be shielded to prevent corruption of the data on the wires and maintain the speed of the data.
You will see, shopping for Ethernet cables, that there are several “Categories” of cable – Cat 5, Cat 5e, and Cat 6 are the common ones available now. The differences are in the speed rating of the cables – Cat 5 can pass data at 10 Mbps or 100 Mbps, Cat 5e can pass data at 10, 100, or 1000 Mbps, and Cat 6 can go up to 10 Gbps. Any of these will work well with AyrMesh equipment – we usually buy Cat5e cables because they are less expensive and widely available. The main physical differences in the cables is how tightly the wire pairs are twisted together.
Finally, the sheath itself can differ quite widely. The normal sheath is usually a form of polyolefin, which does not burn easily. “Plenum-rated” and “Riser-rated” sheaths are coated with a low-smoke PVC, which makes them even more flameproof and reduces the toxicity of the smoke if they do catch on fire. “Direct burial” cables generally have a very thick and heavy sheath, and they may contain a gel that prevents a nick or cut in the cable from admitting water into the cable. Obviously, if water gets into the cable, the wires can corrode and the cable will go bad, but direct burial cables are usually very stiff and very heavy, making them extremely difficult to work with.
Whichever cable you choose, it is imperative that you handle it correctly. Because the cable consists of a bunch of small wires, it is really no stronger than any of those wires. It’s very easy to get a kink in a cable when you’re pulling it through a hole, for instance, and break one of the wires. When that happens, the cable is generally useless.
General Guidelines for Ethernet cables used with AyrMesh products
Make sure the cables are all-copper and shielded (STP) if they’re 25 feet or longer.
Try to get 24 or 22 AWG wires in the cable.
Get plenum-rated or riser-rated cables for use indoors, but don’t use direct burial cables unless you’re going to bury them – they’re too hard to manage.
ALWAYS leave a “drip loop” when you’re bringing a cable run from outside to inside a building so water doesn’t run down the cable and ruin equipment!
Be VERY careful pulling cables – they are more fragile than they seem!
It reminds me that WiFi isn’t entirely straightforward, and some explanations of the vagaries are in order.
As Adam points out, interference is potentially a huge problem on WiFi. One problem is that the 2.4 GHz. WiFi band was partitioned out into 11 channels (in the U.S. and Canada), but most of those channels actually OVERLAP each other. There are only THREE DISTINCT CHANNELS: 1, 6, and 11 – all the other channels overlap at least one of these three (and each other). For a good explanation with graphics, I always recommend Wikipedia.
As he points out, if you have your “indoor” WiFi and your “outdoor” WiFi on the same channel, they’ll interfere with each other, reducing the range and bandwidth of both. Even if they are less than five channels apart this will happen to some degree. The AyrMesh network always comes by default on channel 6, so you can either change your home router’s channel to 1 or 11, or change the AyrMesh channel using your account on AyrMesh.com.
InSSIDer – courtesy of MetaGeek
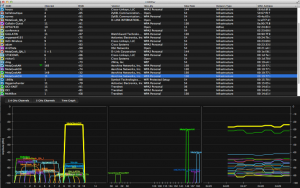
We use and recommend a couple of tools to help discover WiFi interference. InSSIDer for Home is a free program that run on Windows, Mac, or Android, and shows all of the WiFi Access Points in range of the computer and a pretty good estimate of the signal strength of those Access Points. (NOTE: It has recently been pointed out that getting InSSIDer for Home from the Mac App Store actually costs $4.99)
WiFi Analyzer for Android, Courtesy of farproc
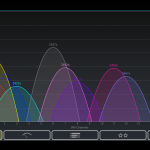
WiFi Analyzer is another free app that runs on Android. It’s a little simpler and quicker than InSSIDer, and has become my “go-to” solution for taking a “quick look around” on my phone.
Chanalyzer Spectrum Analysis, courtesy of Metageek
Just to make it a bit more interesting, however, I have to point out one more fact: WiFi is far from being the only thing using the 2.4 GHz radio band. Cordless phones, baby monitors, wireless surveillance cameras, certain radars, and microwave ovens all use the same spectrum, so they can all potentially interfere with your WiFi. This is, in fact, precisely why Metageek gives away InSSIDer – they sell tools called “Spectrum Analyzers” – their “Wi-Spy” Spectrum Analyzers are excellent and relatively inexpensive. They can show not just WiFi interference, but all the interference in the 2.4 GHz. band. They even offer a very nice “Wi-Spy mini” bundled with their “InSSIDer for Office” product for only $199.
You probably won’t need a spectrum analyzer for your AyrMesh network. Out in the country there’s very little interference, and it takes a while to learn how to use a spectrum analyzer effectively, even with Metageek’s excellent software.
However, getting a copy of InSSIDer and/or WiFi Analyzer is something I recommend to everyone who’s curious about their local WiFi environment.
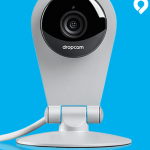
I have been using a Dropcam for about a year now and have been very impressed with it. It is a very low-cost WiFi IP camera that, instead of offering local viewing through a webserver on the device, automatically streams its video to Dropcam’s servers, where you can view the video from anywhere on the Internet.
Just to review, the way a “normal” IP camera works is that it has a webserver on the device, and you access that webserver in order to view the video from the camera. For instance, if you connect the camera to your router, you’ll check the router to find its IP address – let’s say, for instance, that it’s 192.168.1.47.
You then use a web browser to view http://192.168.1.47, and your camera shows up there. However, if you want to view your camera from outside your network, you have to “port forward” a port to the web port on the camera. A number of factors can make that operation difficult.
The Dropcam does away with all of that, because the camera is only attached to your computer with a USB cable ONCE for configuration (it gets the WiFi configuration from your computer – mine uses the WiFi signal from my Remote Hub out in my workshop), then it joins your network and streams its video to dropcam.com. The camera and dropcam.com website have proven to be very reliable.
It is powered with a mini USB cable (5 volts), which is included, along with a wall plug USB power adapter.
Dropcam allows you to view the video from your camera for free on your dropcam.com account. If you want to record the video so you can go back and look at past video (e.g. for security purposes), they have inexpensive recording subscriptions.
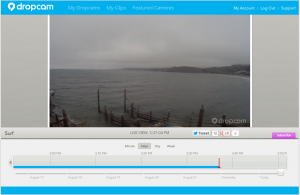
They have a number of demo cameras set up – including a nice one looking out a window onto Monterey Bay in California. While I couldn’t find a demo camera on a farm, this gives you a nice idea of how good the picture is and what the interface looks like – very good, very easy to use.
The Dropcam is very good, but it’s far from perfect. The big advantages are:
Easy to set up and use
Small, lightweight, inexpensive
Transmits video AND audio – look and listen
IOS and Android apps for viewing cameras
Visible over the Internet, no port forwarding
However, it has a few very salient disadvantages:
Not suitable for outdoor use – indoor use only
No local access – you HAVE to be connected to the Internet to view the camera
Fixed lens – no telephoto, no wide angle, no point/tilt/zoom
A couple of seconds delay between the camera and the video stream
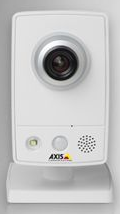
If you have a place you want to keep an eye on, Dropcam is an excellent choice. The quality of the camera and picture is comparable to my “favorite” indoor camera, the Axis M1033-W. As you can see, although the camera has to be indoors, it does a nice job showing outdoor scenes if it can be placed inside a window.
Dropcam is, potentially, a very useful tool for your home and farm.