Tag Archives: ayrmesh

AyrMesh Field Hub – Solar powered to extend the network

We have been asked multiple times how to extend the AyrMesh network beyond the availability of plug-in power. The key, of course, is solar panels and/or wind turbines, along with batteries to hold the power when the sun isn’t shining or the wind isn’t blowing.

Tycon Power has solved this problem for us by developing an integrated system just for the AyrMesh products: Hub, Receiver, or Bridge radio. The product to use is their RPPL-1212-36-30 unit. You can buy it directly from Tycon at their store site. This system with the 30 Watt solar panel will work in most of the country that receives an average of 3.5 hours per day or more – the red and dark orange bands on the standard insolation map. For areas in the light orange or yellow areas on that map, you will need to add a second 30W solar panel (with mounting bracket) or a wind turbine to keep the batteries charged.
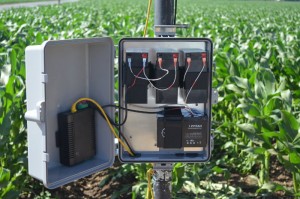
Tycon also makes larger systems for multiple devices. The RPST-1212-100-70 system will provide power for two or three devices – for instance, a Bridge radio and a Hub or two “back to back” bridge radios.

As with the smaller system, if you get less than an average of 3.5 hours of sunlight per day, you’ll need to augment the power generation of that system with an extra 70W solar panel (and mounting bracket) or the wind turbine.
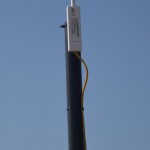
Higher is better

What does it take to set this up? Two things: very rudimentary wiring skills to connect the batteries and the solar panel with the solar controller, and the ability to set up a strong mast or tower. In our tests, we used a 7′ tall free-standing pole, but, for practical use, you’ll want a much taller pole or tower, embedded into the soil with concrete. You need, of course, to get the radios up as high as practical, but at least 25 feet above any obstacles for maximum range. This may require the use of a pole with guy lines or even a tower.

The system provides Power over Ethernet (PoE) for the radios, just like the power supplies that come with the AyrMesh products. The mechanical considerations (attaching the solar panel and battery pack to the pole or tower) is extremely simple, using either U-bolts or hose clamps.  Using this to extend your network out into your fields will enable you to use the AyrMesh Cab Hub to automatically move data off your in-cab computers and have WiFi coverage in your cab wherever you are on the farm.

If you have any questions about this, of course, please feel free to comment on this post or get in touch with us at support@ayrstone.com.

The state of the art in soil sensors – Farmx

As mentioned in an earlier post, we have been working with the RoyseLaw AgTech Incubator. One of the benefits of the program has been the ability to work with some of the most innovative companies coming up. This is one of those companies.

FarmX, based in Tulare, CA, has launched its FarmMap solution in CA and is introducing FarmMap with special pricing for existing Ayrstone customers. To take advantage of this offer, please complete this form.

FarmMap is a low-cost smart farm automation tool that uses scientific grade instrumentation to give you access to all the information you need about your farm in simple, secure, all-in-one tool. The FarmMap’s cloud platform gives you constant, secure access to your data, recommendations and field health.

FarmMap’s system of soil probes gathers information across your acreage with 1 probe for every 10 acres and connects your farm to the cloud. Each FarmMap sensor probes captures key environmental, soil and plant health data in real-time.

FarmMap uses state-of-the-art machine learning techniques to uncover opportunities to improve productivity and reduce the cost of inputs, such as water and fertilizer. FarmMap gives you the confidence to make accurate decisions quickly, accurately, saves you time and gets rid of guesswork.

This is another example of the kind of technology that is available at very low cost when you outfit your farm with an AyrMesh network – each field can be outfitted with a FarmMap gateway device to communicate with their soil sensors, and you can connect the gateways to AyrMesh components (Hubs, Receivers, or Bridge radios, depending on your network) to connect them to your network.

Click below for more information about FarmX and FarmMap:

Ayrstone in the RoyseLaw AgTech Incubator

For the last few months, we have been fortunate enough to be part of the RoyseLaw AgTech Incubator. Our involvement in the incubator many benefits, including access to top people in California business and agriculture as well as the Silicon Valley venture capital community. We expect our involvement to result in many benefits to us as we move forward.

The most important reason we wanted to be part of the incubator, however, was to associate ourselves with some of the most interesting up-and-coming companies in agricultural technology. I would encourage you to check them out to see where “Ag-Tech” is going today.

One other benefit of the incubator is that we are part of the second annual Silicon Valley AgTech Conference on May 11. If you are interested in the future of agricultural technology and you’re going to be in Northern California, please attend the conference. There will be AgTech companies (like Ayrstone), investors, growers, and others with an interest in agriculture and technology.

Long Range WiFi: two approaches

We didn’t invent the idea of putting WiFi on farms and ranches, although I think we’ve done a lot to popularize it. And it’s not really WiFi that’s important, it’s just having a farmwide network that you can connect to and move data with.

When we started, we realized there were two ways we could build out the farm wireless network, and that we’d need to support both ways. However, we had to start somewhere, and we knew that the best short-term “proof of concept” was using the mesh network approach: a bunch of high-power WiFi Access Points that are connected to the Internet and talk to each other using a meshing protocol. That’s what gave rise to the AyrMesh Hub.

Because the Hubs can be up to 2.5 miles apart, it allows you to extend your network out quite a ways from your home place, and that’s useful for a lot of people. It also allows you to “get in the game” for a minimal investment – a few hundred bucks for a Hub and a little time putting it up high and out in the clear gets you WiFi across your farmyard and out into your fields. Then you can extend the network from there with additional Hubs.

However, sometimes you just want to connect someplace into your network, and you don’t need to have WiFi. For those cases, a different approach is optimal: point-to-point microwave links, also known as “bridges.”

A bridge can use WiFi or a WiFi-like signal to connect two locations and pass data between them. Typically they are “Layer 2” devices, meaning that they work just like a long, wireless Ethernet cable. You plug one radio into your network (typically your router) and then plug the other radio into whatever you want to put on your network (a computer, IP camera, WiFi access point, etc.), and everything works just like it was plugged into your router.

The AyrMesh Bridge uses microwave radios that use the 5.8 GHz. band (used for 802.11 WiFi “a,” “dual-band n,” and “ac”), but they use a special “narrow-band” microwave signal that increases the range, reduces the effects of interference, and makes the signal invisible to WiFi “sniffers.”

Of course, if you are just connecting some distant device or devices into your network, you can also use an AyrMesh Hub and an AyrMesh Receiver. It will actually work the same way; the differences are:

  • The AyrMesh Bridge is just a wireless Ethernet cable that doesn’t provide a wireless signal usable by anything else. The AyrMesh Hub provides WiFi that other devices can use.
  • The AyrMesh Bridge is a “1-to-1” system, but you can have several Receivers talking to one Hub.
  • The Receiver can be up to 2 miles from the Hub, but the Bridge radios can be up to 5 miles apart.

It’s not necessarily an “either/or” thing. Several AyrMesh users are using the AyrMesh Bridge to reposition their Gateway Hub to the top of large structures (e.g. grain legs) to give the Hubs maximum range. A couple of people are using their Hubs for WiFi but providing connectivity to other buildings using Bridges (with the Hub and the Bridge radio mounted next to each other on top of the house or office). And you can use a Bridge connected to a Remote Hub to connect a device several miles away from the Hub.

There are a lot of folks out there selling wireless bridges – we think the AyrMesh Bridge is the best for one important reason: it’s the easiest to set up and use. No configuration is needed: you just connect both radios in the Bridge to your router. They download your configuration from AyrMesh.com and then all you have to do is mount them outside pointing at each other.

Providing Internet Coverage in Distant Fields

The AyrMesh network can stretch out a long ways – with the AyrMesh Bridge, Hubs, Cab Hubs, and Receivers, you can extend your network for miles and miles.

But, no matter what, it seems that there is always at least one field your AyrMesh Network won’t reach. I’ll show you what I do to provide WiFi coverage in distant fields.

When I am testing the AyrMesh components, I am usually working remotely. A little while ago I picked up a few things:

  • TP-Link router

    A TP-Link MR-3040 portable router

  • USB cellular adapter

    A USB Cellular adapter (mine is from FreedomPop, because they provide good coverage where I work and are extremely inexpensive, but I also have a Verizon one I use in more remote areas)

  • A 20′ telescoping flagpole – these are available from lots of places; mine is from Harbor Freight Tools because it was inexpensive. There are better-quality poles (and longer ones) available.

The way I set it up is like this:

  • Power extender

    Inside the cab of my truck, I use a 2-way utility plug extender plugged into the “always on” utility plug.

  • Router plugged into USB power, with USB dongle

    I plug a USB charger unit into one of the plugs. The router runs off USB power, so it plugs right into the charger, and the USB cellular “dongle” plugs into the router.

  • Inverter, Hub power supply, and Ethernet cables

    I then plug a small inverter into the other power plug, and plug the Hub’s power supply into the inverter. I run a short Ethernet cable from the “LAN” port on the Hub’s power supply to the Ethernet port on the router, and plug a 30′ Ethernet cable into the “PoE” port of the power supply

  • I then run the long (orange) Ethernet cable out through the side window of my truck so it can be connected to the Hub.

    Ethernet Cable

  • Flagpole stand

    I built a mount for the back of my pickup, using a piece of steel, a length of PVC pipe, and a couple of hose clamps. Some people also use a “drive on” flagpole stand, or a hitch receiver flagpole stand.

  • I mount the Hub on the flagpole with a zip-tie, and connect the long Ethernet cable to the Hub.
  • Hub mounted on pole

    After making sure the Hub is on and connected to the Internet, I push the mast up to maximize the range of the Hub.

Pole extended, ready for use.

I can then set up a Cab Hub in a vehicle and use the Internet while I’m working, up to 2.5 miles from my truck.

This setup is not perfect for use on very windy days, because the flagpoles can move around and reduce the effectiveness of the Hub.

The other caveat is that you’ll want to locate the Hub at a high location so it receives a good cellular signal and maximizes the Hub’s WiFi signal. This only works well if you have a place with good cellular coverage and good “line of sight” to your fields.

Recently I have swapped out the power inverter and power supply for a power plug and a “passive PoE injector,” which actually makes the setup a little simpler. I also have a Verizon USB “dongle” that I sometimes use when I’m testing.

Setup with PoE injector and Verizon dongle

This setup is frequently very handy for me, and it can be very useful for you to use in remote fields. You lose the advantages of being connected to your “home” network (being able to browse files on your local machines or print to networked printers), but you should have good Internet connectivity for collecting data to the “cloud,” browsing the Internet, checking email, etc.

Introducing the AyrMesh Bridge

Today we are pleased to announce the availability of the AyrMesh Bridge.

The AyrMesh Bridge is a simple, wireless, point-to-point bridge. It serves a single purpose – to connect a distant device to your local network – a 5-mile long wireless Ethernet cable.

Wireless bridges have been around for a long time, and we had initially rejected the idea of adding a wireless bridge to the AyrMesh product line. If you have the Hubs and Receivers, why do you need a Bridge?

Testing in California

However, several customers have come to us in the last year with the same problem: their Gateway Hubs are on top of their homes or offices, but they would be better placed on top of a grain leg or another building with a better “view” of the surrounding fields.

In these cases, it would be possible to use one Hub near their routers to feed a Hub on the high location, but that would limit the ultimate range of the AyrMesh network (because we recommend only using up to three “hops” across Hubs).

The truth is that there are a lot of places the AyrMesh Bridge can be used:

  • Connecting an isolated outbuilding to your network (if you don’t want or need WiFi – if you want or need outdoor WiFi, of course, the Hub and a Receiver is a better solution)
  • Connecting a non-WiFi device that is more than 2 miles from a Hub or Receiver
  • Any other situation where you think “I wish I had an Ethernet cable that long.”

We are using a special radio signal for the AyrMesh Bridge to maximize the range. It is a narrow-band 5 GHz. signal, which is hidden and fully encrypted. Although it uses the 5 GHz WiFi band, it does not register with any WiFi equipment because it is a narrow-band signal. This minimizes interference with 5 GHz. WiFi  signals, but does not completely eliminate it. If you are using 5 GHz WiFi equipment (802.11a, ac, or dual-band n), you’ll want to use different channels for your AyrMesh Bridge than your WiFi equipment.

Contents of the AyrMesh Bridge package

The AyrMesh Bridge comes complete with two radios (one for each end of the Bridge), power supplies, and 10′ Ethernet cables. Like all Ayrstone AyrMesh products, each radio is initialized by plugging it into your router until it shows up on AyrMesh.com, then it can be installed.

Like all AyrMesh devices, the Bridge radios are controlled by AyrMesh.com, as shown here. There is only one control for the Bridge – the 5 GHz. channel can be set to 149 (the default), 153, 157 (as shown here), 161, or 165. Note that these are distinct channels; unlike the 2.4 GHz. WiFi channels they do not overlap.

The AyrMesh Bridge is the simplest way to connect a device to your network at a considerable distance. Please contact us if you have any questions or comments about it.


IP Cameras on the Farm: Part 1

Many people start building an AyrMesh network on their property to provide Internet access across their acreage. However, having an Internet Protocol (IP) network across your property gives you the opportunity to connect devices on the property to help you be more productive, more efficient, safer, and happier.

When I ask people what else they’d like to do with their AyrMesh Network, the first thing that usually comes up is cameras – the ability to see their property remotely.

There are two distinct reasons for putting cameras on your property: the first is what I call “situational awareness” – being able to bring up a view of some part of your farm any time you want. The second is for security – automatically monitoring some view of your property and alerting you when something happens.

If you have animals on the farm, you probably worry about them – especially if your livelihood is tied up in them. One of the most common uses for cameras on the farm is to be able to check on the animals, whether it’s just so the kids can see the horses when you’re away or if you need to check on farrowing sows, calving cows, or foaling mares to protect your investment.

A lot of people also just want to be able to view some part of the property, like the driveway or the kid’s play area, so they can know what’s going on any time. Sometimes these cameras may be dual-purpose, serving both a security function and for situational awareness.

Putting a camera on your property gives you a “view” – you get the IP address of the camera from your router and you can bring up that view from anywhere on your property. Then you can do what’s called a “port forward” on your router to make your camera viewable from the Internet, wherever you may be. For instance, I always forward port 9001 to a camera in my living room. I can look at my public IP address on AyrMesh.com and find that it’s 99.100.101.102 (it’s not, but let’s pretend…), so I just need to point a browser to http://99.100.101.102:9001 and log into my camera (note: you HAVE to have a good, strong password on your camera).

Next we’ll talk a little about the different kinds of IP cameras and the tradeoffs and compromises you can make – see part 2 here.

RAM mounts for the AyrMesh Cab Hub

(NOTE: all the pictures in this post can be clicked to see at full-size).

One of the questions we get from time to time is, “What’s the best way to mount the Cab Hub in the cab?”

It’s important to be able to mount the Hub high, because the cable to the magmount antenna is relatively short, and it’s important to be able to mount it securely so it’s not banging around inside the cab. The Hub is not designed for vibration and shock, so it is also useful to isolate the Hub from the cab somewhat.

Our friends at RAM Mounting Systems, Inc. offered to help. I’m a big fan of RAM mounts, and I eagerly accepted their offer to help out. I have a RAM mount in my truck with their “X-Grip” mount for my smartphone and a suction cup. I tried mounting the Hub in it, and it did work, but it did not hold the Hub as firmly as I’d like.

The folks at RAM asked one question: “Is it affected by strong magnetic fields?” When I told them it was not, they said, “then let’s try a magnetic mount.” I told him I had a suction cup base in the truck but I didn’t want to use that in a tractor, so he sent me a “Tough-Claw” to attach to the rack in a tractor. But he also sent me a beefier suction cup for use in the truck and elsewhere.

They sent me a package consisting of the following items:

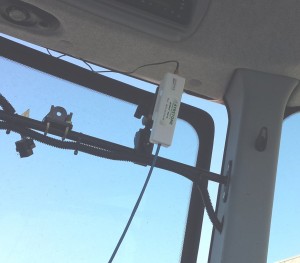
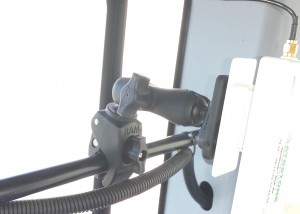
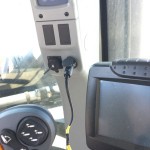
I was able to test this setup on a number of different vehicles. I went to Coastal Tractor in Salinas and they gave me the use of a New Holland T-9 4WD tractor. It was extremely easy to mount the Hub on the tractor’s rack, as shown on the left. The pieces were very simple to assemble and attach to the tubing on the tractor. Here’s a closeup of the mount:

As you can see, it’s attached with nice, large wingnuts. It was not loose and did not slip, but the rubber in the Tough-Grip and the articulation balls on the mount mean that little vibration would be transmitted to the Hub.

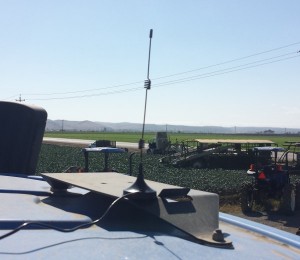
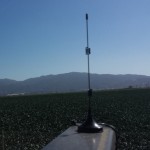
I put the Cab Hub Antenna on top of the tractor and plugged it into the utility power plug in the cab, and the installation was complete – it took about 10 minutes (because I had to get out and climb the other side of the tractor to install the antenna).

While I was there, I also tried mounting it successfully on an open-cab tractor they had, and put the antenna on the ROPS cage.

I had not brought along any zip-ties so I could secure the antenna cable to the ROPS, but the power cord plugged easily into the utility plug under the dashboard.

One of the most intriguing uses I have seen for the AyrMesh Cab Hub is actually for use on an All-Terrain Vehicle (ATV), so I  went over to GPSports to take a look at what would be involved. They had one in the service bay they said I could mess with, so I mounted the Hub on it. The Tough-Grip was again easy to use on the tubing – the only problem was that there was no place to put the antenna where it would be high, because this ATV had no roll bar. In the parking lot, however, they had some “side-by-side” models, so I made sure the magnetic antenna worked on the roll cage.

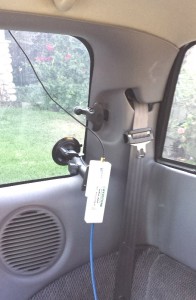
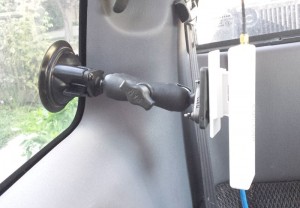
My final test was back in the truck – I traded the Tough-Grip for the suction cup and attached the mount to the back window of my “extended cab” pickup. It has been on there for several days now, and has not yet moved.


The bottom line on all this is that a small investment in RAM mounts can make mounting your AyrMesh Cab Hub VERY easy in any Vehicle.

Once again, Ayrstone would like to thank the good folks at RAM Mounting systems, Coastal Tractor, and GPSports.

Bringing WiFi into your Cab – the new AyrMesh Cab Hub

There’s a lot of data being collected by monitors in the cabs of tractors, sprayers, and combines, and getting that data someplace it can be used can be critical to your operation. Today we are introducing a way to connect your tractors, sprayers, combines, and trucks to your AyrMesh Network: the AyrMesh Cab Hub.

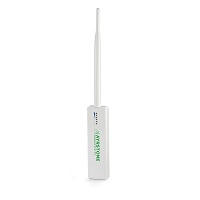
The AyrMesh Cab Hub is a combination of three things: our trusty, patent-pending AyrMesh Hub2n, a cable that allows the Hub to be powered from a normal 12 volt utility “cigarette lighter” plug, and an external magnetic-mount antenna to get the Hub’s antenna outside and up in the clear.

When it is all set up, the AyrMesh Hub2n rides inside the cab of your vehicle, protected from shock and vibration, but mounted where you can see the “signal lights” if you need to. The cable is plugged into one of the 12v utility outlets, and the antenna is put on a ferrous surface on top of the cab. The Hub connects to the other Hubs in your AyrMesh network, giving you WiFi connectivity in your cab.

The most valuable data on the farm, and some of the hardest data to move to where it can be effectively used, are the data trapped in the monitors on your machines: as-seeded, as-applied, and harvest data. Getting that data out has been laborious (moving Compact Flash cards) or expensive and uncertain (using cellular links), so we’re trying to make it easier with the AyrMesh Cab Hub.

By using the AyrMesh Cab Hub, you’ll have a strong WiFi signal in your Cab whenever you’re in range of one of your other AyrMesh Hubs – up to 2.5 miles away. This means you can use your smartphone, tablet, or laptop from the cab of your tractor, sprayer, combine, or truck. It also makes it easy to transfer data from your WiFi-equipped in-cab monitors, like an AgLeader monitor with their AgFinity adapter, using your AyrMesh network. If your equipment doesn’t currently have WiFi, talk to your dealer about it – vendors are rolling out new products all the time.
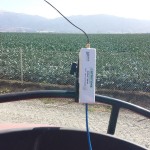
If your monitor supports WiFi data transfer, you can use your AyrMesh network to transfer data from your monitor without having to rely on expensive and unreliable cellular links.

Please let us know what you think of this new product from Ayrstone Productivity!

Why AyrMesh.com?

This is one of the questions we get in Ayrstone support from time to time: why do I HAVE to use AyrMesh.com? Why isn’t there just a setup menu on the device?

My answer is simple: if you’re using a single Hub, then it doesn’t much matter:  you have to set the configuration on the device or you have to set the configuration on AyrMesh.com. About the same amount of effort.

But, if you’re using more than one AyrMesh device – Hubs or Receivers – on your network, using AyrMesh.com saves you time, because all your devices automatically configure themselves from AyrMesh.com. Furthermore, because they check into AyrMesh.com every few minutes, you can always check there to make sure your AyrMesh devices are working properly.

Our entire goal in creating the AyrMesh System was to make it so easy that anyone could set it up and use it, and you’d spend as little time as possible fiddling with your network and as much time as possible enjoying its benefits. AyrMesh.com is an important part of that value